Showing posts with label stacking logs. Show all posts

Sunday, March 17, 2013

Split Rail Fence

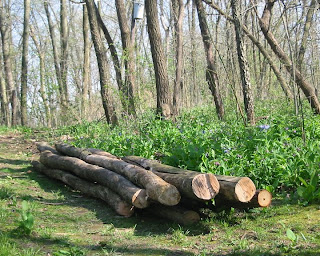
It's that time of year again. Time to clean up the dead fall of winter. Here's a forty foot elm that I was able to cut into three 12 foot lengths.
Once cut into lengths I split them into halves and some larger halves into quarters.
These are the kind of rails Abe Lincoln spent his youth splitting. 
This kind of fence was very common at one time. It's easy to assemble, easy to move and easy to re-purpose if you run low on firewood or rough lumber. Ours won't keep anything in or out, just give hunters a heads-up when crossing our property lines.
The rails are stacked one on top of another in a zig-zag pattern to help with stability. Typically the rails are between 10 and 12 feet long, the ends are overlapped to make the distance between 'points" roughly eight feet. The distance between the zigs or zags is an old measurement called a rod (roughly 16 feet). Old farms used to measure out acreage using rods and these fences helped people estimate the size of their fields.

Wednesday, January 2, 2013

Cordwood Masonry Home

I recently read an article about a beautiful home, hand-built by a couple I had the pleasure of meeting in person. Jessica Diemer-Eaton is an author, historian, educator, artist, and owner of Woodland Indian Educational Programs. I met her husband Mark in the fall of 2011 at an event I featured here. Mark and Jessica built the wigwam on the grounds of Prophet's Town State Park. Mark also helped me find some seed stock for my three sisters garden that day. Jessica and Mark are the proud owners/creators of a Cordwood Masonry home. I asked Jessica if she would write a guest post for the blog and send me some pictures to share with you. I'll turn things over to Jessica now. Please give her a warm welcome!

Building & Living In Our Cordwood Masonry Home
No it’s not stone masonry, although from a distance that is what our walls are mistaken for.  Our 16-sided home is built with cordwood masonry.  Cordwood construction, the building of walls by stacking cordwood using a mortar to bind, is an often overlooked construction style.  Most folks have yet to hear of it, even though it is a building style of antiquity.  But why cordwood masonry?  Why not just a log cabin?  Well, cordwood masonry is a great alternative for log home lovers who especially 1. Don’t have an ability to maneuver large logs and 2. Want the look of wood log walls inside and out, but don’t want to sacrifice interior temperature efficiency. 
Ease in BuildingBeing a woman under 5ft in height, I was able to build our cordwood house walls alone while my husband was at work.  Most construction methods will not allow for that, and those that do, such as other masonry materials like stone and brick, require a certain amount of skill that is usually acquired with experience.  Being a novice builder, never doing masonry before, I felt the learning curve was something that could be overcome in just a couple days work.  However, keep in mind that this ease of building does come with one larger setback - time.  If you chose cordwood, do so with the understanding that this construction is a long process.  The cordwood must be seasoned, laying it up is time consuming, and you can only build so high before the lower layers are dry.
An Efficient Home
The walls being 16” thick feature a hollow inside filled with cedar chips for insulation.  The mortar beads on the inside and outside are only 4” wide, leaving a hollow interior – the secret to insulation of the walls.  We don’t even have conventional heat, only wood heat provided by a Russian-style fire place in the middle of the home.  In a cold winter, after a few days of firing, we usually top out at 80-84 degrees in the living room.  We can stop for 3 to 5 days, and lose only 10 degrees of heat.  There is nothing more efficient than our cordwood walls.
Points of Light
Cordwood is a great canvas; many like to create images in the walls using the cordwood ends like mosaics, or put unconventional items into the mortar.  Usually, most cordwood builders will put a few bottles in their walls to bring in some beautiful spots of light.  Because the walls are 16” thick, each “bottle window” requires two bottles or jars, top ends put together, and rolled in aluminum flashing.  When stacked into the wall, only the bottoms of the bottles or jars are visible both inside and outside. 
A Round Floor Plan
Besides the look of a round home, one reason to pick this shape has to do with floor space; round buildings get more square footage for less money. However, what many people don’t talk about is that extra space lost due to an unusual floor plan.  Round homes don’t have the wasteful space of hallways, but we do still have space issues created by our round fireplace that sits in the middle of the house and holds up our roof.  So, no, we don’t have a hallway, we have a donut.  And just like a hallway, this doughnut shape can easily become underutilized.  We have counteracted that by placing an office behind the fireplace, two sitting areas on each side, and bar in front of the fireplace overlooking the kitchen.  Also, any money you saved by having a round floor plan may have to be put towards building custom furnishings.  As it turns out, most cabinetry is not made for walls that have angles more than 90 degrees, or have a little natural wave in them.  Cordwood walls are never straight, and our countertop’s width has a 2” inch difference between the middle and ends of the counter (one reason we used broken tiles for mosaics, as square tiles would have shown this variation in countertop width and the wave in the wall).  We chose to build our cabinets to get the style we wanted, and to save money.
It Comes Down To Cost In all, our home cost about $43,000 to build, including the tools needed to build the home.  We only paid for two jobs done through outside professionals: pouring the concrete foundation and applying the rubber membrane roof (which is a specialized process and warrantied through professional installation).  Friends and family helped us build some walls, construct the massive fireplace, wire the home for electricity, and install a new and efficient type of plumbing that utilizes plastic tubes that bend and expand, not ridged pipes prone to burst if it freezes.  For that price, we have almost 1,500 sq ft of living space divided between two bedrooms, bathroom, storage room/bathroom, kitchen, living room/dinning room, and the common room in the middle (aka the donut hallway that contains my office behind the fireplace).  It’s not large, but a great size for 2 people.
  Learn more about our cordwood home and cordwood construction at http://www.squidoo.com/living-in-a-cordwood-masonry-house

Sunday, August 22, 2010

Purlins, Gables and Ridgepole

Hands down the toughest job so far. As I mentioned before I had to re-design the roof plan based on the lack of suitable dead trees left on the property. I had to scrap plans for a loft over the porch that would have given me an additional 15 or so feet of storage space but I was still able to gable the roof. 
 The first  big challenge was to get the purlins up on the walls. I'm 82 inches high at the corners now so I had to lift these logs over my head to get them up on the walls. These are the Hackberry logs I floated up the river, they are strong, straight and heavy. The largest is 9 inches at the butt and 8 inches at the tip. All are ten feet in length. The ridgepole stands ten feet off the cabin floor. 
I used Cherry, Box Elder and Elm for the gables. I have some left over scraps of bridge decking I will be using as makeshift rafters. Those are the boards you see laid across the purlins. Cutting off the ends of the gable course logs at an angle with the pitch of the roof is extremely difficult, as you can see I still have to get the back side gable trimmed up. The sheeting you see on the side of the cabin is the corrugated metal I'll be using for the roof. The previous owner of the property left around fifty sheets like these stacked up on the side of the garage.
I slid the metal up to see if my rafter scheme will work. Not ideal but it does look like I can make it work. I hope to get the gables trimmed up and the rafters nailed down next weekend. Who knows maybe I'll even get some sheet metal tacked down!

Sunday, July 25, 2010

Close but no cigar!

Cut 16 notches, stacked ten logs over the weekend. Looks like I won't make my deadline for being under roof by August. But pretty close. I have a family reunion next weekend so this will probably be the last update for a couple of weeks. My foraging efforts last weekend helped me find three standing dead trees of appropriate size for my uses.
I chopped this one down with the axe because it was growing up from the side of a steep and slippery ravine. I didn't trust myself with the saw under those conditions so I got a nice workout. I tied a rope around it before I dropped it so that I could haul it back up the hill after it fell. Even at 11:00 a.m. my little point and shoot camera had to turn its flash on to take a picture this deep in the woods. Gives you an idea of how lush the canopy is this time of year. "The woods are lovely dark and deep" - Robert Frost.

The walls are almost finished. I just need a couple more courses and I can start the roof! Can you believe it is almost August? Time flies when your having fun.

Sunday, July 18, 2010

Interior

Cut 12 notches and stacked eight logs yesterday. The walls are now over five feet high all the way around.
Which brings me to the next image. Drum Roll please...the first ever taken from INSIDE the cabin!


As you can see the gaps between logs are wide.


My plan is to wedge smaller logs (sticks) into the gaps and seal them up with mortar. Below is a quick example of what I mean for illustrative purposes. I'll whittle them down to make a better fit before the mortar goes on.


Today I'm heading back into the woods to forage for some more dead trees. I need six more nine foot logs to finish up the walls.

In  other news.  Kent over on the Tiny House Blog posted an update I sent him. Thanks Kent! His blog is an incredible resource for ideas and examples of all sorts of construction methods and man does it make my Google analytics go wild when Kent posts an update. I had 193 visits to the blog the day Kent posted the story!

Monday, July 5, 2010

Half way up!

Happy Independence Day!
I had three days off work and got 28 notches cut and seventeen logs stacked. The walls are half way up.

Nothing particularly exciting to share, except maybe my plumb line. This is the poor man's lazer level. A string with a nail tied to it. Helped me get straight lines to square up the doorway.


Sorry for the brief  update. I spent way too much time in the heat this weekend. To quote my favorite pirate ..."Stagger, Stagger, Crawl, Crawl ... or was it ... Crawl, Crawl, Stagger Stagger?" - Yellow Beard

Sunday, June 20, 2010

Hot and Wet!

Rain finally stopped yesterday morning about 9 a.m. The sun came out and turned the woods into a sauna. I got three logs peeled. Thought I would post a picture of the spud hoe in action on a log. A spud hoe is so named because it is used for digging potatoes....(I think). Its a straight bladed hoe. Works great taking off big strips of bark.


This is the cause of all these dead elms. These little trails you see on the log below are the work of a beetle that carries a fungus that kills the trees. (At least that's the story I've heard)


I decided to try notching this log with just the axe. It was pretty tough and it took a lot longer than using the chainsaw but I have to admit it felt pretty darn good to whale on that log and watch the chips fly!

By the end of yesterday I had eight new notches cut and a new course stacked. No where near the three courses I'd convinced myself I could do. The heat and humidity made four hours seem like eight. We have a 30% chance of rain everyday for the next five days so I got out early this morning and stacked the logs up to get them off the ground. I tacked a couple of salvaged 2"x6" boards up in the doorway to check the width of the opening. I don't know if you can see it but there is an orange trumpet vine blossom tied to one of the boards at seven feet. The bench is 20" tall. So, it looks like the notched part of my walls are just under 1/3rd up.

Happy Father's Day!

Monday, May 17, 2010

Cutting the decking

Time to start cutting the old bridge decking down to size. I'm five weekends into this project now and finally starting to see some results.
The footprint of the cabin will be 12'x12' with the enclosure only 8'x10'. The front three feet will make a small porch.
About now I'm thinking maybe I'll hoist a sail on this bad boy and ride it down the river!
Stacked the logs back up to keep them off the ground over the coming week. We have predictions for rain on four of the next five days.

Hauling Logs

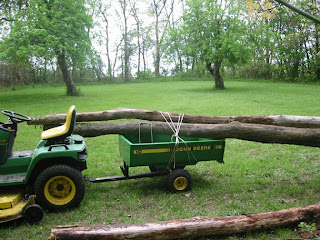
The next big challenge was to get the logs out of the woods. I found that for the most part I could lift and carry anything 12 foot long with a diameter of under 9 inches far enough to get them on the trailer of the tractor
 
Once I got them on site I started stacking them to keep them off the ground and get a feel for the size and shape of each log.
It took about three weekends to get thirty logs cut and hauled out of the woods. It was at this point that I decided not to use the old French method. I started to like the idea of the more familiar looking Swiss style cabins that the American settlers of the 19th century brought to the Wabash Valley. This way I won't have to dig fifty feet of four foot deep trench!