Monday, May 31, 2010

More logs

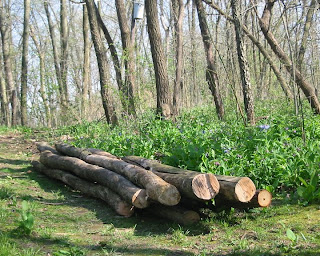
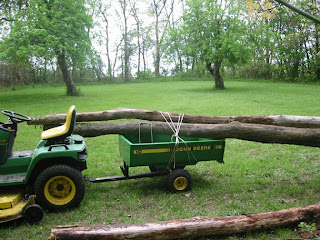
Spent Sunday hauling logs out of the woods.
I got four trees cut up into eleven logs of various sizes and managed to get six of them on site before the heat got the better of me.

I still have five to gather up and I spotted a fresh windfall on the hillside, still has bark and everything!


Happy Memorial Day!

Tacking down the floor

Got an early start Saturday morning and spooked a doe with her fawn. I had my camera with me but the mama deer was so distressed I just passed by as quietly as possible. The little fawn was hunkered down in the grass trying to hide while the doe stomped and circled trying to decide if she should run from me or take me down. Nice reminder of how fortunate I am to live in such a beautiful place. Anyway, I started the day by stripping the cabin down to the floor and squaring up the decking as best as possible. Then I tacked down the boards with 16 penny nails. This is what happens to cheap fiberglass handled hammers when used to drive big nails through hardwood!

Once I secured the floor to the joists I lag bolted the short sill log to the decking to keep it from sliding around.
About eight hours later I had eight new notches cut and joined. I tried using a long groove cut on the first course above the sill and it did make a nice snug fit but pulling two angled cuts for six feet was really tough. On the remaining front side logs I pulled long straight cuts to flatten the sides that stack on each other. The back and front walls are tight but the sides have large gaps between courses. I'm thinking I will put small 3" diameter logs into those gaps just wedged and toe nailed in before chinking.
Ended the day burning the slash pile and roasting some pork chops over the fire. I was treated to a serenade of coyote howls and the familiar "Who Cooks For You" hoot of the Barred Owls.

Sunday, May 23, 2010

Notching


On the first notch I tried scribing the contour of the lower log onto the upper log then made a series of vertical cuts down to the line. Once the cuts were made I used the hatchet to knockout the chunks.
That made a nice snug fitting joint but it was very time consuming and hard to carve the contour out with only the hatchet and no chisel so I'm going to stick to the simpler "V" saddle notches from here out. Just cut two angles to the appropriate deepth on the edges and knock out the middle using the hatchet/axe whack method.
First seven  notches cut and joined!

Splitting the sill log


I need a flat sill log on the face of the cabin for the threshold. So I cut one of the twelve footers that I couldn't pick up into two six footers and cracked one open.
Once you whack the front of the log enough to crack it you follow the crack with a hatchet or wedge and slam it with the back of the axe. Snap crackle pop.


 Eventually it splits
Now I have two sorta kinda equal halves.
Plained them down with the edge of the saw to flatten them a bit more.


I used one six foot half on one side and cut the other six foot half into two three footers. One three footer is on the other side and I used the other three foot half to make a bench with some decking scrap. The gap between will be the doorway.

Monday, May 17, 2010

Cutting the decking

Time to start cutting the old bridge decking down to size. I'm five weekends into this project now and finally starting to see some results.
The footprint of the cabin will be 12'x12' with the enclosure only 8'x10'. The front three feet will make a small porch.
About now I'm thinking maybe I'll hoist a sail on this bad boy and ride it down the river!
Stacked the logs back up to keep them off the ground over the coming week. We have predictions for rain on four of the next five days.

Foundation and Joists

The foundation is made from three logs set right on the ground. The two outside logs are an old utility pole left on the property by the power company. It is kiln dried and creosote soaked to prevent rot. It has been on the ground for over eight years and still no noticeable signs of rot so I think it will work fine for the cabin. The center log is one of the dead Elms and will rot fast in contact with the ground so I painted it with some left over oil based wood treatment/stain that the previous owner of the property left in the basement.
In order to hang the joists I had to make plunge cuts in the two outside logs. I was not looking forward to plunging a running chainsaw tip into a log but I got the hang of it.
 
Once the two vertical cuts and the bottom plunge cut are made you just set a hatchet on top whack it with the backside of an axe and POP the wedge comes right out. Pretty cool.
On the center log I made saddle notches to carry the joists. I'm going to have to cut about a thousand of these before its over so this was good practice. 
Joists are hung!

Flooring


My neighbor had torn down an old bridge that spanned a pond on his property and stacked the decking up along a fence row. I noticed this decking looked like old locally milled hardwood and asked him if I could salvage it to build a floor with. He told me to "Knock myself out"... so I did.
The wood was wet and covered in mud so I scraped it off with a sharpened spud hoe and stacked it up to dry. The spud hoe makes a great log peeling tool as well. 
It took most of one weekend to haul the decking to the site, scrape it clean and stack it up to dry.

Hauling Logs

The next big challenge was to get the logs out of the woods. I found that for the most part I could lift and carry anything 12 foot long with a diameter of under 9 inches far enough to get them on the trailer of the tractor
 
Once I got them on site I started stacking them to keep them off the ground and get a feel for the size and shape of each log.
It took about three weekends to get thirty logs cut and hauled out of the woods. It was at this point that I decided not to use the old French method. I started to like the idea of the more familiar looking Swiss style cabins that the American settlers of the 19th century brought to the Wabash Valley. This way I won't have to dig fifty feet of four foot deep trench!

Felling leaning trees

Instead of waiting for the dead fall to come down on its own I decided to harvest the dead trees and build a cabin out of them. The first thing I had to do was find some instruction on dropping trees that lean into others. These are called "widow makers" because they can fall quite unpredictably when cut.

I found a few helpful resources on the internet. The most helpful was the one that instructed me to cut the wedge out of the tree on the top side and then cut the strap on the under side. This effectively caused the tree to drop straight down only a matter of a few inches. The tops of the trees remained lodged in the surrounding trees which turns out to be pretty manageable.
Once the tree is free from the stump you can wedge a sturdy branch under it as a lever and lift the tree up slightly. As you lift the tree will slide slowly back towards the stump. Move it back about a foot at a time and eventually the smaller branches at the top will free themselves from the surrounding trees and it will drop. I didn't take any photos of the leveraging process because...well, I was leveraging! This is one of the above windfalls with the top cut off after bringing it down. As you can see I only had to lift it a few feet back past the stump before it came down.

Welcome to the House of Fallen Timbers

For many years I have been cutting up fallen trees for firewood that piles up waiting for those occasional evenings when I build an outdoor cook fire.

Most of the wood is dead Elm and stands in the woods for years before it falls.

This year I thought I'd try something completely different. I decided to build a log cabin. I hoped to use the Poteaux-en-Terre method that the first French settlers of the Illinois Country used in the eighteenth century.